
Published on March 26, 2024
Table of Contents
Overview
In the great race of Kubernetes container network interfaces (CNIs), there can be a ton of options available depending on your use-case. The Kubernetes page with the list of CNIs that can provide networking with network policies is over 10+ entries! However, one of these names has been there for quite a long time: Calico.
Being in the networking game for a while, Calico has racked up an impressive list of features, and the open source product itself, which consists of cluster networking and network policies, has been considered a stable and mature offering in the networking landscape. It additionally provides value-add options on its Enterprise offerings as well, but for today’s blog post, we’ll only focus on Calico’s open source features.
While network policies remain out-of-scope for this post, we’ll be diving a bit into Calico open source’s networking implementations, do some real-life benchmarks, and compare and contrast between the different options available for networking: Standard Linux mode and eBPF mode.
Calico, Tigera and Typha
Calico is a network and security plugin for your Kubernetes cluster that allows workloads in your cluster to be able to communicate and secure those communications as well. There are three levels of Calico goodness: the open source stuff (networking + network policies) which you might be the most familiar with, the Enterprise offering, which adds a ton of other features such as WireGuard encryption for networking and a web GUI for managing your installation, and finally the Cloud option for container image scanning technology.
When perusing the Calico open source documentation (which from here on out will be referred to as just “Calico”), you will notice the “Tigera” operator as an option to install in the cluster. The Tigera operator simplifies the process of installing the rest of the components needed for Calico, including the CRDs and the Calico node DaemonSet, and manages the upgrades on your behalf. If you are not interested in having the operator manage Calico, you can install the bare manifests directly into your cluster instead.
One more topic to discuss is what “Typha” is and what its purpose is in the cluster: normally, the Calico node DaemonSet runs three daemons in every node:
- Felix, the main daemon that performs the IP address management (IPAM) for all the workloads in the cluster. This includes assigning IP pools to Nodes, IP addresses for Pods, etc.
- BIRD, the BGP daemon that distributes the network information to the other Calico nodes.
- confd, the daemon that watches for configuration changes and updates the relevant config files.
By default, Felix stores all configuration and runtime information as k8s API objects. However, when dealing with hundreds of nodes and tens of thousands of workloads, Felix will invariably stress the API server with its stores and fetches. To lessen the impact of Felix in the cluster, Typha can be installed as the middleman between hundreds of Felix instances and the API server. For smaller clusters, installing Typha and configuring Calico to use it would be unnecessary to do, but for larger clusters it’s usually a hard requirement.
With all of that out of the way, let’s go ahead and start using Calico in a cluster!
Using Calico
To install Calico and configure it for networking, a cluster with no networking
plugin installed is required. For this blog post, we’re using a cluster that’s
spun up in AWS using Cluster API with a single control plane node and two
worker nodes (see our previous post on Cluster API Provider AWS
for more details on how to do this), since an EKS cluster already comes with
networking enabled (via the aws-node DaemonSet). The only noteworthy
difference from the standard Cluster API AWSCluster manifest is that we’ll
want to ensure that its network configuration has the Calico ports open after
installing the CNI:
apiVersion: infrastructure.cluster.x-k8s.io/v1beta2
kind: AWSCluster
metadata:
  name: aws-cluster-calico-test
spec:
  region: us-east-1
  sshKeyName: default
  network:
    cni:
      # This part is usually autogenerated after installing the CNI, however
      # it's always good to check in the cluster after installation, though!
      cniIngressRules:
      - description: bgp (calico)
        fromPort: 179
        protocol: tcp
        toPort: 179
      - description: IP-in-IP (calico)
        fromPort: -1
        protocol: "4"
        toPort: 65535
To install Calico on this cluster, we follow the manifest-specific
instructions for EKS. Note that the difference between the EKS cluster and our
CAPA cluster for the sake of the installation instructions is just the lack of
the aws-node DaemonSet in the cluster, so we can skip the step that removes
that DaemonSet from the cluster.
We run the following commands to install Calico on our CAPA cluster:
$ kubectl apply -f https://raw.githubusercontent.com/projectcalico/calico/${CALICO_VERSION}/manifests/calico-vxlan.yaml
poddisruptionbudget.policy/calico-kube-controllers created
serviceaccount/calico-kube-controllers created
serviceaccount/calico-node created
serviceaccount/calico-cni-plugin created
configmap/calico-config created
customresourcedefinition.apiextensions.k8s.io/bgpconfigurations.crd.projectcalico.org created
customresourcedefinition.apiextensions.k8s.io/bgpfilters.crd.projectcalico.org created
customresourcedefinition.apiextensions.k8s.io/bgppeers.crd.projectcalico.org created
customresourcedefinition.apiextensions.k8s.io/blockaffinities.crd.projectcalico.org created
customresourcedefinition.apiextensions.k8s.io/caliconodestatuses.crd.projectcalico.org created
customresourcedefinition.apiextensions.k8s.io/clusterinformations.crd.projectcalico.org created
customresourcedefinition.apiextensions.k8s.io/felixconfigurations.crd.projectcalico.org created
customresourcedefinition.apiextensions.k8s.io/globalnetworkpolicies.crd.projectcalico.org created
customresourcedefinition.apiextensions.k8s.io/globalnetworksets.crd.projectcalico.org created
customresourcedefinition.apiextensions.k8s.io/hostendpoints.crd.projectcalico.org created
customresourcedefinition.apiextensions.k8s.io/ipamblocks.crd.projectcalico.org created
customresourcedefinition.apiextensions.k8s.io/ipamconfigs.crd.projectcalico.org created
customresourcedefinition.apiextensions.k8s.io/ipamhandles.crd.projectcalico.org created
customresourcedefinition.apiextensions.k8s.io/ippools.crd.projectcalico.org created
customresourcedefinition.apiextensions.k8s.io/ipreservations.crd.projectcalico.org created
customresourcedefinition.apiextensions.k8s.io/kubecontrollersconfigurations.crd.projectcalico.org created
customresourcedefinition.apiextensions.k8s.io/networkpolicies.crd.projectcalico.org created
customresourcedefinition.apiextensions.k8s.io/networksets.crd.projectcalico.org created
clusterrole.rbac.authorization.k8s.io/calico-kube-controllers created
clusterrole.rbac.authorization.k8s.io/calico-node created
clusterrole.rbac.authorization.k8s.io/calico-cni-plugin created
clusterrolebinding.rbac.authorization.k8s.io/calico-kube-controllers created
clusterrolebinding.rbac.authorization.k8s.io/calico-node created
clusterrolebinding.rbac.authorization.k8s.io/calico-cni-plugin created
daemonset.apps/calico-node created
deployment.apps/calico-kube-controllers created
Finally, we’ll need to set FELIX_AWSSRCDSTCHECK=Disable, as without it our
workloads will have issues communicating with each other. Disabling the
FELIX_AWSSRCDSTCHECK flag allows Calico on the EC2 instance to route traffic
within an AWS VPC subnet without needing to use IP-IP encapsulation. For more
information, see the documentation
regarding this flag.
$ kubectl -n kube-system set env daemonset/calico-node FELIX_AWSSRCDSTCHECK=Disable
daemonset.apps/calico-node env updated
After installing Calico, you should have a fully-working cluster, ready to accept workloads:
$ kubectl get pods -A
NAMESPACE     NAME                                                  READY   STATUS    RESTARTS   AGE
kube-system   aws-cloud-controller-manager-cw88w                    1/1     Running   0          3m53s
kube-system   calico-kube-controllers-68cdf756d9-dfwnf              1/1     Running   0          4m32s
kube-system   calico-node-7gmz2                                     1/1     Running   0          4m3s
kube-system   calico-node-bwrvx                                     1/1     Running   0          4m24s
kube-system   calico-node-f7x9j                                     1/1     Running   0          4m14s
kube-system   coredns-5dd5756b68-8tkjn                              1/1     Running   0          4m5s
kube-system   coredns-5dd5756b68-jvqhx                              1/1     Running   0          4m7s
kube-system   ebs-csi-controller-6b77d78c79-p662d                   6/6     Running   0          3m45s
kube-system   ebs-csi-controller-6b77d78c79-q866m                   6/6     Running   0          3m45s
kube-system   ebs-csi-node-4tp9p                                    3/3     Running   0          3m25s
kube-system   ebs-csi-node-828ns                                    3/3     Running   0          3m34s
kube-system   etcd-ip-10-0-75-153.ec2.internal                      1/1     Running   0          20h
kube-system   kube-apiserver-ip-10-0-75-153.ec2.internal            1/1     Running   0          20h
kube-system   kube-controller-manager-ip-10-0-75-153.ec2.internal   1/1     Running   0          20h
kube-system   kube-proxy-228qc                                      1/1     Running   0          20h
kube-system   kube-proxy-ckgvc                                      1/1     Running   0          20h
kube-system   kube-proxy-ntbp7                                      1/1     Running   0          20h
kube-system   kube-scheduler-ip-10-0-75-153.ec2.internal            1/1     Running   0          20h
Enabling the eBPF dataplane and benchmarking
By default, Calico is pre-configured to use what it calls the “Standard Linux” routing dataplane when installed. What most people don’t know is that this is one of multiple dataplane configurations that are available:
- “Standard Linux”, which is just
iptablesunder the hood. - eBPF dataplane
- VPP dataplane
- Windows HNS, which we won’t touch on in this blog post.
We’re really interested in the eBPF dataplane and its purported benefits so we want to test it against its “Standard Linux” dataplane. To do so, we’ll be leveraging the InfraBuilder/k8s-bench-suite repository, with some small tweaks so that we can compare performance on traffic that runs via the CNI vs traffic that just uses host networking. The benchmark will measure network performance by sending traffic:
- Between two Nodes (using host networking).
- Between two Pods (using the configured CNI).
- Between a Pod and a Service (CNI +
kube-proxy).
We’ll be running the following experiments:
- Run the benchmark tool which runs
iperf3to measure network performance, using the default Calico configuration (withiptables). - Enabling eBPF mode, disabling kube-proxy, and measuring network performance.
- Enabling direct return mode (DSR) and measuring the performance.
Before we begin, we do want to make sure that our AWS security groups allow
our iperf3 tests to use the 5201 port on the host network (for the benchmark
between the nodes). To do this, we’ll update our CNI ingress rules, which will
allow Cluster API to modify the AWS security group in which the EC2 instances
are a part of so that it allows the traffic produced by iperf3.
apiVersion: infrastructure.cluster.x-k8s.io/v1beta2
kind: AWSCluster
metadata:
  name: aws-cluster-calico-test
spec:
  network:
    cni:
      cniIngressRules:
...
      # We want to add these following sections underneath all the CNI
      # options that already exist!
      - description: iperf3 (TCP)
        fromPort: 5201
        protocol: tcp
        toPort: 5201
      - description: iperf3 (UDP)
        fromPort: 5201
        protocol: udp
        toPort: 5201
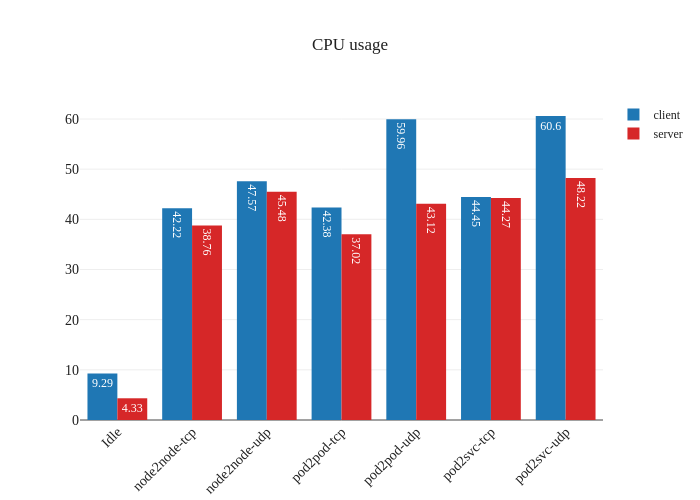
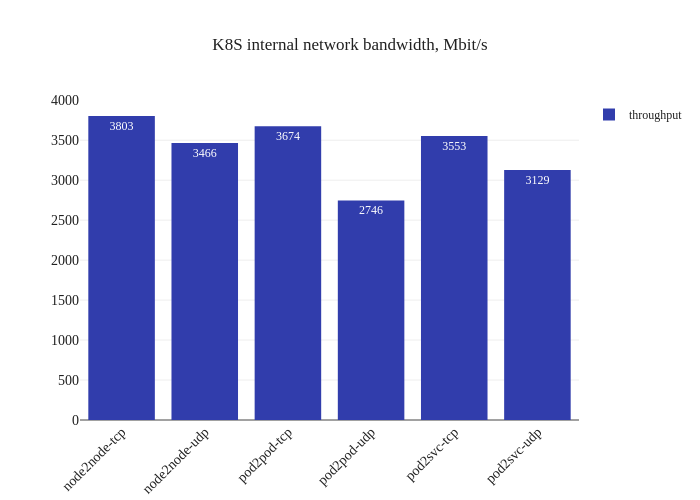
Standard Linux dataplane
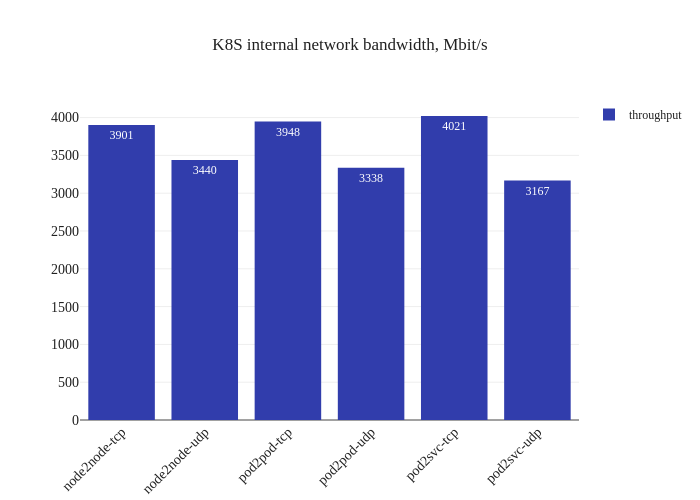
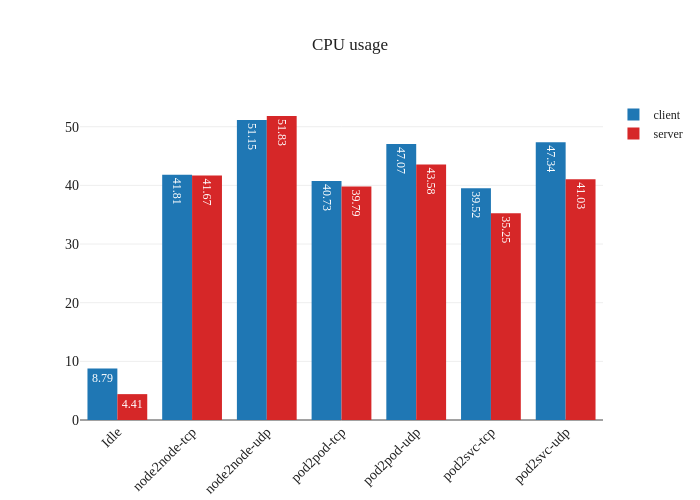
For this test, no changes were necessary to the existing Calico configuration. We run the command to start the test:
$ ./knb --verbose --client-node ip-10-0-112-167.ec2.internal --server-node ip-10-0-87-108.ec2.internal -o data -f calico-test-standard.knbdata
And we plot out the results (using the same tool):
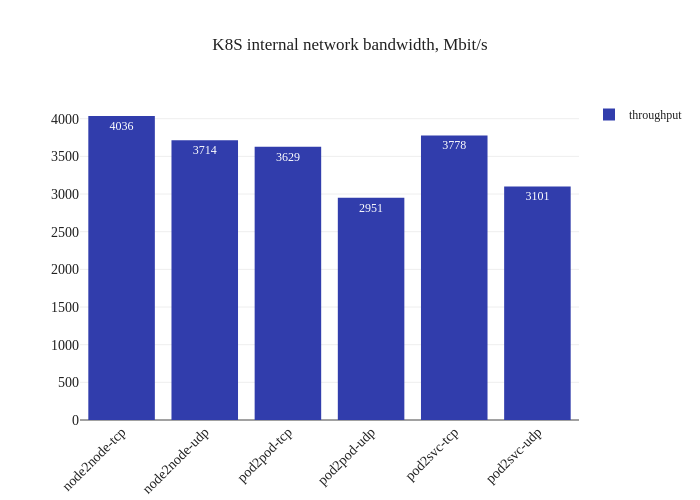
The results showcase the usual overhead of a CNI: our worker nodes use
t3.medium instances which have speeds of up to 5 Gbits
and the expectation is that the CNI overhead will cut into the throughput
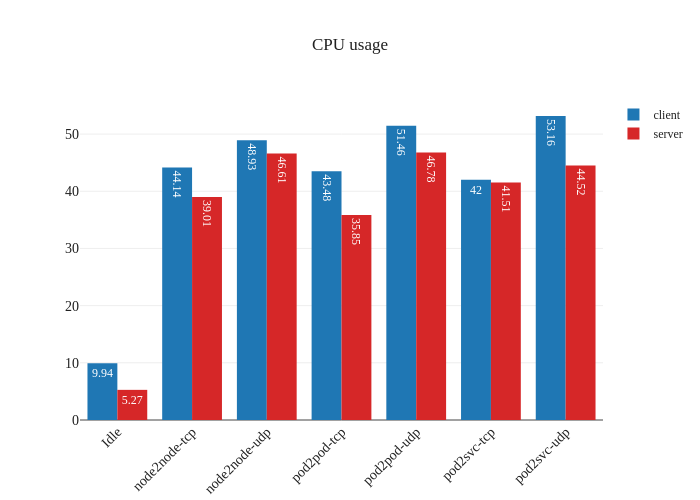
of the traffic in the cluster. We can also see that there’s some heavy CPU
usage (percent-wise) when running the benchmark. We actually ran the same
tests twice to ensure it was not a fluke:
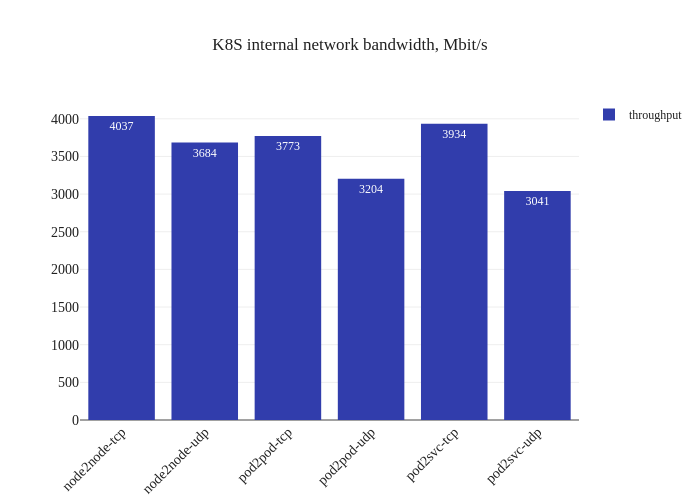
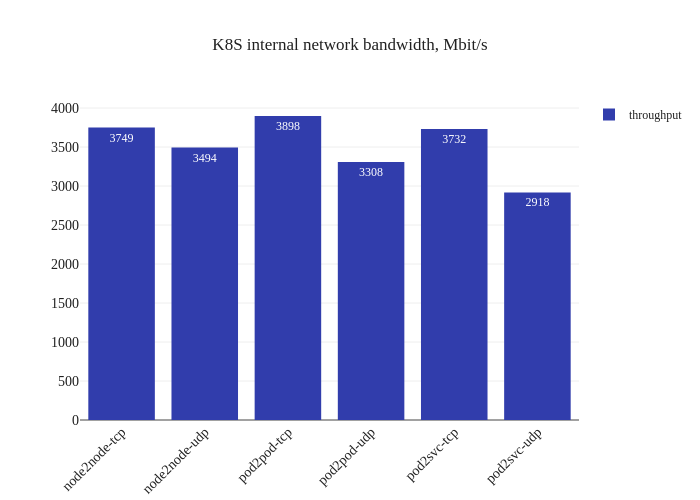
eBPF dataplane
Fortunately, to enable the eBPF dataplane, it’s as simple as a single command:
$ calicoctl patch felixconfiguration default --patch='{"spec": {"bpfEnabled": true}}'
This command does require require the installation of calicoctl, however the
configuration can be modified via kubectl as well, since it’s a k8s API
object:
$ kubectl get felixconfigurations.crd.projectcalico.org default -oyaml
apiVersion: crd.projectcalico.org/v1
kind: FelixConfiguration
metadata:
  name: default
spec:
  bpfConnectTimeLoadBalancing: TCP
  bpfEnabled: true
  bpfExternalServiceMode: Tunnel
...
Also, enabling eBPF mode means that we don’t need to run kube-proxy anymore
since the eBPF dataplane can route Service traffic as well. We can “disable”
kube-proxy temporarily by setting a nodeSelector that doesn’t apply to any
of our nodes:
$ kubectl patch ds -n kube-system kube-proxy -p '{"spec":{"template":{"spec":{"nodeSelector":{"non-calico": "true"}}}}}'
First thing that’s noticeable is the lack of downtime when enabling the eBPF dataplane – existing datapaths will not be modified when eBPF mode is enabled, since only new workloads will start using the newly-enabled dataplane. Pretty neat! Now, let’s see what the benchmarks say:
Impressive! The bandwidth graphs are less lopsided, and it seems like in-cluster networking mirrors host networking performance for all TCP traffic! For UDP traffic, it seems like the every test but the Pod-to-Service one also has pretty good improvements as well.
The takeaway here isn’t that we now magically will outperform host networking speeds, but rather that the CNI overhead is now pretty minimal, which might means that sometimes host networking performance will seem worse. Another test will validate that theory:
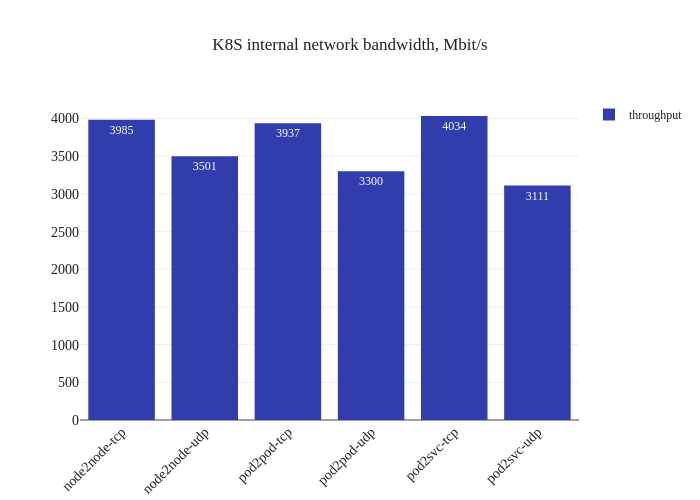
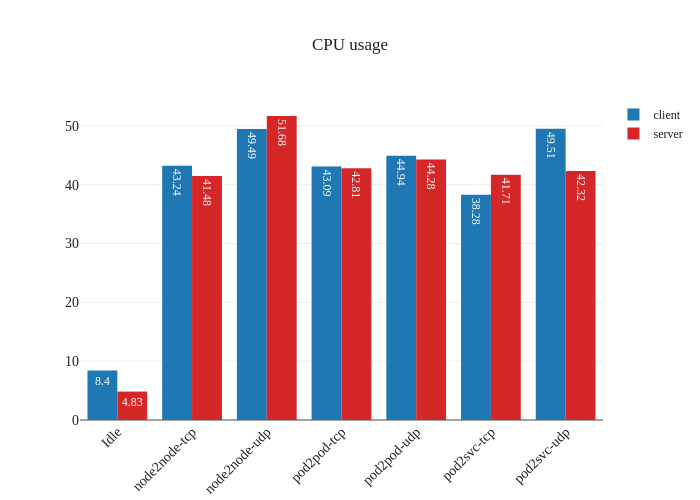
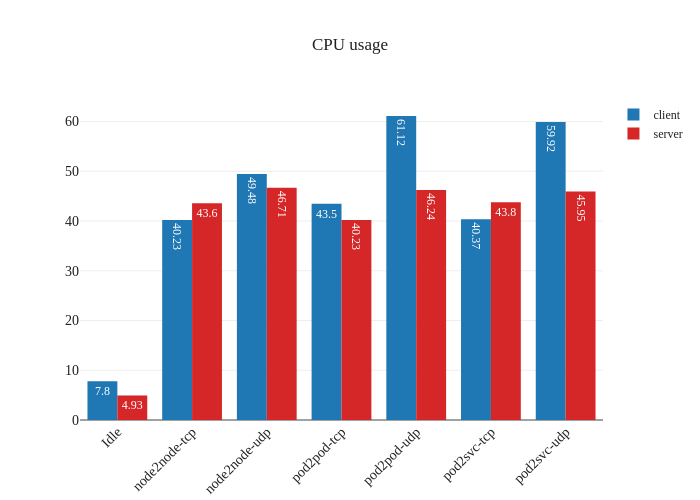
The other noteworthy detail is the difference in CPU usage when in eBPF
mode, particularly when it comes to UDP traffic. It seems like previously
our nodes were churning the CPU hard to process all the UDP traffic, but after
the switch to eBPF and disabling kube-proxy, there’s a large decrease in CPU
usage.
eBPF dataplane + DSR
Finally, let’s enable direct return mode:
$ calicoctl patch felixconfiguration default --patch='{"spec": {"bpfExternalServiceMode": "DSR"}}'
In theory this should improve performance by reducing latency and CPU overhead, but shouldn’t be a big impact:
In our tests, it doesn’t seem like there was much of an improvement. If anything, it seems a bit worse:

However, this is not a critique against enabling DSR mode – the testing methodology might simply not be enough to measure the benefits of this mode due to the limitations of running a small scale cluster. The eBPF dataplane really shines once decisions have to be made at the level of thousands of nodes or tens of thousands of pods, which is a scale that’s not being accurately modeled in our tests.
Conclusion
In this post, we took a look at what Calico is, its features and its use-cases. We installed Calico on an AWS cluster and measured the network performance changes when we were switched from its Standard Linux dataplane to the eBPF dataplane. We were able to see marked improvements in network bandwidth and CPU usage, which coupled with the lack of drawbacks from enabling eBPF mode, makes it a very attractive feature to enable on clusters that have Calico installed. While the jury is still out on DSR mode, it’s safe to say that the simplicity and the benefits of eBPF mode should be compelling enough for users to enable it and reap its fruits without too much worry.
If you liked this content and would like to see more, please subscribe (yes, we still ❤️ RSS) or join our mailing list below.